How to Make Caramel: Easy 4-Ingredient Recipe & Pro Tips
Anyone who’s watched a pot of sugar turn from white crystals to a shimmering amber liquid knows that moment feels a little like kitchen magic. But there’s real science behind it — and with the right temperature cues and a few simple tricks, you can reliably make caramel sauce, firm-set caramels, or even dulce de leche without a grain of grit.
Caramelization temperature: 160–177°C (320–350°F) ·
Basic ingredients: Sugar, butter, cream (optional) ·
Cook time for dry method: 10–15 minutes ·
Shelf life (sealed, refrigerated): 2–3 weeks ·
Main chemical process: Pyrolysis of sucrose
Quick snapshot
- Sugar + butter + cream + salt — 10–15 min stovetop (King Arthur Baking (trusted baking resource))
- Pour over desserts, ice cream (King Arthur Baking (trusted baking resource))
- Cook to 245°F (118°C) soft-ball stage (Food52 (home cooking authority))
- Ideal for millionaire shortbread and candies (Food52 (home cooking authority))
- Slow simmer in can or oven — no stirring required (ThermoWorks (temperature measurement experts))
- Thick, spreadable caramel via Maillard reaction (ThermoWorks (temperature measurement experts))
- Coconut milk + sugar + salt — no dairy needed
- Slightly different flavor profile, equally versatile
Five key facts, one pattern: caramel is entirely about controlling heat and sugar crystal behavior. Get those two variables right, and you unlock a whole range of textures.
| Fact | Value | Source |
|---|---|---|
| Caramelization starts at | 160 °C (320 °F) | ThermoWorks (temperature instrumentation specialist) |
| Burnt sugar point | ~180 °C (356 °F) | Kitchen Stories (cooking education platform) |
| Soft-ball stage (set caramel) | 118 °C (245 °F) | Food52 (home cooking authority) |
| Calories per tablespoon | ~50–60 (sauce) | USDA standard estimate |
| Primary flavor compounds | Furans, maltol, diacetyl | Dickinson College Chemistry in the Kitchen (academic chemistry lab) |
What is the easiest caramel recipe?
Simple stovetop method with 4 ingredients
- 1 cup (200 g) granulated white sugar
- 6 tablespoons (85 g) unsalted butter, cut into cubes, at room temperature
- ½ cup (120 ml) heavy cream, at room temperature
- 1 teaspoon flaky sea salt (optional — for salted caramel)
The easiest method uses just sugar, butter, cream, and salt. It requires no candy thermometer if you watch color closely, though a thermometer guarantees consistency. According to Food Network (major US cooking channel), the wet caramel method (starting with a little water) is more forgiving for beginners than the dry method because the water helps sugar dissolve evenly before caramelization begins.
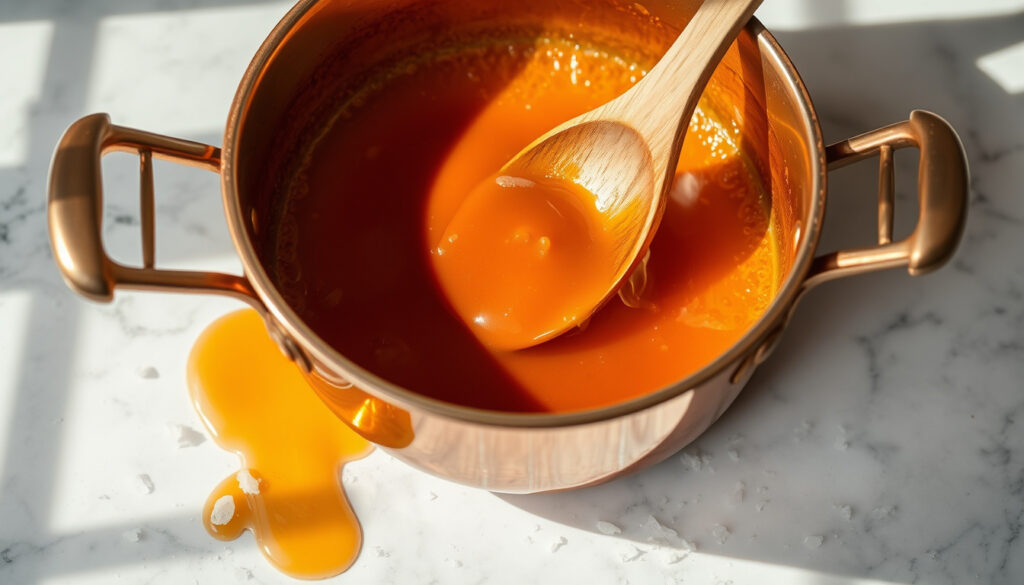
Heat the sugar and ¼ cup water in a heavy-bottomed saucepan over medium-high heat. Swirl the pan gently as sugar dissolves — never stir, or you risk crystallization. Once the mixture turns a deep amber (about 340°F / 170°C according to Kitchen Stories (cooking education platform)), remove from heat and whisk in butter, then cream. The mixture will bubble vigorously — that’s normal.
Home cooks save about 10 minutes by skipping the thermometer, but risk either under-caramelizing (pale, bland sauce) or going past 350°F into burnt territory. A $10 thermometer pays for itself in the first batch of unburned sugar.
What this means: A wet-start caramel with unsalted butter and heavy cream gives beginners the widest margin for error. The four-ingredient method works because the water prevents premature caramelization and the dairy stops the cooking process quickly once added.
No-cook condensed milk shortcut
For the laziest caramel possible, a sealed can of sweetened condensed milk submerged in simmering water for 2–4 hours turns into dulce de leche with no temperature monitoring at all. The ThermoWorks (temperature measurement experts) explain that this method relies on the Maillard reaction rather than straight caramelization — milk proteins and sugars brown at a much lower temperature (~100°C / 212°F), meaning the result is thicker, creamier, and less prone to burning than stovetop caramel. The trade-off: you lose the pure caramelized-sugar flavor that only comes from taking sucrose above 320°F.
What this means: The condensed milk shortcut trades flavor depth for safety and convenience. Home cooks who want a foolproof spread without watching a thermometer get a thick, caramel-like result, but they sacrifice the nutty, complex notes that only high-heat sugar caramelization provides.
Is caramel just melted sugar and butter?
Role of sugar caramelization
At its simplest, yes — but “melted” undersells what’s happening. Pure sucrose melts at 186°C (367°F), but caramelization begins before that, around 160°C (320°F), when heat breaks sugar molecules into hundreds of new flavor compounds: furans (nutty), maltol (toasted marshmallow), and diacetyl (buttery). Rutger Bakes (European pastry resource) states that caramel forms when sugar is heated to at least 170°C (338°F). Below that, you’ve just got sweet melted sugar — not caramel.
Why butter and cream are added
- Butter adds fat and emulsifiers that create a smooth mouthfeel. It also lowers the final temperature of the mixture, stopping the caramelization process instantly when added off-heat.
- Cream provides body and dilutes the sugar concentration, making the sauce pourable rather than glass-like. Without cream, your caramel would harden into brittle within minutes of cooling.
Cook’s Illustrated (test-kitchen research publication) notes that adding an acidic ingredient such as a squeeze of lemon juice helps interfere with sucrose crystallization by breaking some sugar molecules into invert sugar — that’s what keeps your sauce silky instead of gritty.
What this means: Caramel is not simply melted sugar. The chemistry of sucrose pyrolysis creates hundreds of flavor compounds, and the addition of butter and cream transforms a glass-hard sugar mass into a pourable, emulsified sauce. Without dairy, you get caramelized sugar brittle, not caramel sauce.
How does condensed milk turn into caramel?
Maillard reaction vs caramelization
Caramelization is the thermal decomposition of pure sugar — no proteins involved. The Maillard reaction, by contrast, happens when sugar and protein are heated together, creating a more complex, savory-sweet flavor profile. Sweetened condensed milk contains both sugar and milk proteins, so it undergoes Maillard browning at around 100°C (212°F) — far lower than the 160°C needed for pure caramelization.
Dulce de leche method
- Stovetop method: Submerge sealed can in simmering water for 2–4 hours. The can must stay fully submerged at all times.
- Oven method: Pour condensed milk into a baking dish, cover with foil, and bake at 200°F (93°C) for 1.5–2 hours, whisking halfway through.
- Result: A thick, spreadable caramel with no added sugar needed. It sets firmer than cream-based sauce because the milk solids provide structural support.
Never open a hot can of condensed milk after simmering — pressure builds inside and the contents can erupt. Let it cool completely to room temperature before opening.
What this means: Condensed milk caramel is not true caramelization — it’s Maillard browning. The lower temperature required makes it safer for beginners, but the flavor profile is distinctly different: creamier and more savory, lacking the pure toasted-sugar notes of stovetop caramel.
What’s the secret to perfect caramel?
Temperature control and tools
ThermoWorks (temperature measurement experts) present caramel at 320° to 350°F as a sugar stage used for varying colors and flavors of caramel. A digital candy thermometer is the single most important tool for consistent results. Food52 (home cooking authority) breaks down the color spectrum: light amber at around 340°F, medium amber at 345°F, and dark amber at 348°F — just 8 degrees separate pale from nearly burnt.
Preventing sugar crystallization
- Don’t stir after sugar dissolves. King Arthur Baking (trusted baking resource) advises to swirl, not stir, once the sugar has fully melted. Stirring introduces air and undissolved crystals that seed graininess.
- Add corn syrup or acid. Cook’s Illustrated (test-kitchen research publication) says replacing some sugar with corn syrup helps prevent crystal formation because corn syrup contains glucose molecules that dilute sucrose, making it harder for crystals to align.
- Brush down the sides. Use a wet pastry brush to wash down any stray sugar crystals from the pan walls. KitchenPrep (home cooking guide) recommends this as an extra safeguard against crystallization.
Even experienced bakers occasionally get a grainy batch when humidity is high — sugar is hygroscopic and absorbed moisture can trigger crystals that no technique fully prevents. The fix: add a tablespoon of corn syrup to the next batch, not to the ruined one (you can’t undo crystallization once it’s happened).
What this means: Perfect caramel comes down to two things: a thermometer to nail the 8-degree window, and anti-crystallization techniques (swirl, corn syrup, wet brush) that prevent graininess. Cook’s Illustrated confirms that adding an acid or corn syrup is the most reliable insurance policy against crystallization.
How to make caramel that sets for desserts?
Caramel for millionaire shortbread
For a firm-set caramel that holds its shape when sliced, you need to cook the sugar mixture to the soft-ball stage: 245°F (118°C). Food52 (home cooking authority) notes that firm ball stage (245–250°F) is ideal for soft caramels. At this temperature, the sugar concentration is high enough that the caramel will set at room temperature but remain chewy rather than hard. Pour it over a shortbread base, let it set for 2 hours, then top with chocolate.
Caramel for banoffee pie
Banoffee pie calls for a softer, spoonable caramel that won’t crack when you cut through the bananas and cream. Use the 4-ingredient sauce method from above — it remains pourable at room temperature because the cream and butter keep the sugar concentration below the set threshold. Food Network (major US cooking channel) says caramel cooked only to 320°F is the upper limit for soft applications; for banoffee pie, aim for the lighter end of that range (320–340°F).
Firm vs soft set caramel
The deciding factor is final cooking temperature:
- Soft set (sauce): 320–340°F (160–171°C) — pourable, no ball stage
- Firm set (candies): 245–250°F (118–121°C) soft- to firm-ball stage
- Dulce de leche: ~200°F (93°C) via Maillard reaction — thick but spreadable
The pattern: The final temperature determines the texture. A soft ball stage at 245°F gives you sliceable caramel for shortbread, while a lower temperature of 320–340°F yields a pourable sauce for banoffee pie. The condensed milk method, at an even lower temperature, produces a spreadable texture that falls in between.
Upsides
- Only 4 common ingredients needed
- Versatile — sauce, set, or spread
- No specialized equipment (thermometer optional)
- Store-bought quality for a fraction of the cost
Downsides
- Narrow temperature window between done and burnt (~8°F)
- Grainy crystallization can ruin a batch in seconds
- Condensed milk method takes 2–4 hours
- Cleanup requires soaking — burnt sugar is stubborn
Step-by-step: Foolproof 4-ingredient caramel sauce
- Prepare ingredients: Measure 1 cup sugar, 6 tbsp butter (cubed, room temp), ½ cup heavy cream (room temp), 1 tsp salt (optional). Room-temperature dairy prevents spattering and seizing.
- Wet start: Combine sugar with ¼ cup water in a heavy-bottomed saucepan. Heat over medium-high without stirring until sugar dissolves — about 3 minutes.
- Boil without stirring: Once mixture boils, stop all stirring. Swirl the pan occasionally. Watch for color change — at 5–7 minutes you’ll see pale yellow, at 10–12 minutes deep amber.
- Check temperature: If using a thermometer, remove from heat at 340°F (170°C). If going by eye, the caramel should be the color of a copper penny — not dark brown.
- Add butter: Off heat, whisk in butter cubes one at a time. Mixture will bubble — that’s steam escaping.
- Add cream: Slowly pour in cream while whisking. Bubbling will intensify; keep whisking until smooth, about 30 seconds.
- Cool and store: Let cool in the pan for 5 minutes, then transfer to a glass jar. Refrigerate for up to 3 weeks. Reheat gently in a water bath or microwave in 10-second bursts.
Once you’ve poured the amber liquid off heat and watched it transform into a smooth, glossy sauce, the takeaway is simple: temperature and patience are the entire game. For anyone making caramel at home in the UK or US, the choice between a $10 thermometer and learning to read color by eye comes down to how many batches you’re willing to sacrifice. Home bakers who make caramel more than twice a year should invest in a digital probe thermometer — it eliminates the one variable that causes most failures. For everyone else, the wet method with careful swirling and a light copper color target will reliably deliver sauce that beats anything from a jar.
“Swirl, don’t stir, once the sugar has fully melted. That single rule is the difference between silky caramel and a grainy mess.”
— King Arthur Baking test kitchen
“Adding an acidic ingredient such as lemon juice helps interfere with sucrose crystallization by breaking some sugar molecules into invert sugar.”
kitchprep.com, kitchenfiftyseven.com, lifetips.alibaba.com, blogs.dickinson.edu, flypeachpie.com
Frequently asked questions
Can I make caramel without a candy thermometer?
Yes — watch the color closely. Light amber (340°F / 170°C) is ideal for sauce. For firmer caramel, you’ll need a thermometer. Color alone can’t measure the 8-degree window between medium amber and burnt.
Why did my caramel turn grainy?
Graininess is crystallized sugar. It happens when you stir after the sugar dissolves, leave undissolved crystals on the pan walls, or have humid weather. Brush down the pan sides and never stir — just swirl.
Can I use brown sugar instead of white?
Yes, but it changes the flavor and color. Brown sugar contains molasses, which adds deeper flavor but also makes the caramel darker and slightly more prone to burning at lower temperatures. ThermoWorks notes that brown sugar caramelizes faster because its moisture content speeds up heat transfer.
How do I store homemade caramel?
Store in an airtight glass jar in the refrigerator for up to 3 weeks. To reuse, warm gently in a water bath or microwave in 10-second bursts. Do not boil — it will separate.
What is the difference between caramel and butterscotch?
Butterscotch is made with brown sugar and butter, never white sugar, and is cooked to a lower temperature (soft-ball stage, ~240°F / 115°C). It relies on the molasses flavor of brown sugar rather than the pure toasted sugar flavor of caramel.
Can I reheat caramel that hardened?
Yes, but only if it hasn’t crystallized. Gently warm over low heat with a splash of cream, whisking constantly. If the caramel is already grainy from crystallization, reheating won’t fix it — the sugar crystals have already set.
Is it safe to boil a can of condensed milk?
Yes, with precautions: remove the paper label, place the sealed can in a pot deep enough to keep it fully submerged by at least 2 inches of water at all times, and simmer gently. Never open a hot can. If the water level drops below the can, it can explode. The ThermoWorks guide recommends the oven method as safer for first-timers.
Related reading
- How Many mL in a Tablespoon? US, UK & Australia Conversions — precise measurements are critical for caramel success
- 100 Grams to Cups: Exact Conversions for Flour, Sugar, Butter — convert your ingredients accurately
More related posts
 House for Rent Rotorua: Find Your Perfect Rental Home
 Nobody Wants This Season 2: Release Date, Cast, Early Buzz
 How to Win Friends and Influence People: Summary & Guide
 30 AUD to NZD: Convert Australian Dollars to New Zealand Dollars
 Daily Post Deaths Today: Find Obituaries & Death Notices
 Movie Theater Showtimes in Hamilton, New Zealand – Top Cinemas & Deals
 Huggies Nappy Pants Size 6: Age, Weight, and Sizing Guide
 Call of Duty Warzone – Free Download, Season 03 and Beginner Guide